Introduction
There’s many options to enable SSL on your websites or applications. One of the most popular services for home lab users to request SSL certificates is Let’s Encrypt. It’s a free service that allows anyone to get certificates for their domains with very little headache and is also able to be automated via ACME. That’s a different tutorial and I might cover it later.
Cloudflare has a service where they offer free wildcard domain certificates for any domain that you have registered with their DNS servers. This service is also powered by Let’s Encrypt; that might sound like extra steps but there’s many benefits that I think make the experience worth it.
Why Cloudflare?
First and I think most importantly for most people, Cloudflare has a service called “DNS proxying” that allows you to anonymize your IP while still leaving your websites accessible. This is great for those that are privacy oriented and would like to keep visitors from knowing their IP address. There are downsides to that, Cloudflare will only allow HTTP and HTTPS (and ICMP) traffic through their
proxy so you won’t be able to use this service to hide a VPN connection to your house.
The second reason to use Cloudflare is that their certificates are valid for up to 15 years instead of just 90 days, in the case of Let’s Encrypt. This means that there’s less of a chance in your certificate expiring without you remembering to renew it or your service failing to renew automatically. The downside to this is that Cloudflare does not provide an automatically renewing certificate in the free tier so you must manually update your certificates or order an auto-renewing certificate if you do not wish to upgrade your plan to the business tier.
Prerequisites
For this guide you will need the following:
- A domain name with any registrar (ex: Google, GoDaddy, FreeNom).
- pfSense router with a public IP address (not behind CGNAT or something weird).
- On your pfSense router, change the GUI access from port 443 to something else (ex: 10443).
- Install HAProxy package from the package manager.
Let’s get started
I purchase my domains through Google in order to get the email forwarding that they provide but this process will work with any domain registrar. Cloudflare provides some good documentation and the steps are pretty simple:
- Create a free tier account with Cloudflare.
- Click ‘Add site’ and follow the instructions to import your site to Cloudflare’s DNS. You will want to select the free plan at this step! Depending on your registrar this part could take a while to update. Luckily with Google it was almost instant.
- On the dashboard, click DNS. You will need to create an A record to point your domain name to your public IP address. Ensure that proxied is selected to hide your IP from the public. You can use a service called Dynamic DNS to update this automatically but I will cover that in a separate guide.

- If you are creating different websites as subdomain you can add them as CNAME records to the A record you already created. HAProxy will handle this on the backend. I created a www record to allow visitors to use either
https://michaelcalabrese.meorhttps://michaelcalabrese.me - Click on the SSL tab. For my setup I’m going for maximum security and not really worrying about backwards compatibility so I will walk you through the extra steps I took.
Note that this might limit clients connecting with older browsers, like really old.
On the Overview page:
-
- set SSL/TLS encryption mode to Full
On the Edge Certificates page
-
- Always Use HTTPS: ON
- Opportunistic Encryption: ON
- Minimum TLS Version: TLS 1.2
- TLS 1.3: ON
- Automatic HTTPS Rewrites: ON
- Certificate Transparency Monitoring: ON (optional, but who doesn’t want to know if new certs are issued)
Optional step that will help your SSL score
-
- Enable HSTS and configure as follows:
- Enable HSTS: On
- Max Age Header: at least 6 months
- Apply HSTS policy to subdomains: On
- Preload: On
- Enable HSTS and configure as follows:
- For the next step you have two options, you can either create your own CSR from pfSense or you can create the entire certificate on Cloudflare and just import it to pfSense. Either will work, I have migrated pfSense boxes and re-imported the certificate with no issues.If you’re generating your own CSR ago ahead and do that from the System -> Cert. Manager section of pfSense. On Cloudflare, click the Origin Server tab and click Create Certificate. On the next screen you will click ‘Use my private key and CSR’ then paste the data into the box. All other defaults are perfectly fine. Click Create. Copy the certificate data and put it into pfSense to finish creating the certificate.If you’re using Cloudflare to generate the certificate and private key, click the Origin Server tab and click Create Certificate. On the next screen accept everything the way it is and click Create. Take the certificate data and private key and paste it into the System -> Cert. Manager section of pfSense. I highly recommend storing this information in your backups somewhere because there is no way to retrieve the private key from Cloudflare again.
- You will need to download the Cloudflare Root CA found in their documentation. Once you download this you can import it into the CA section of the Cert. Manager in pfSense. That’s it for the certificate setup!
- On pfSense you can access HAProxy settings from Services -> HAProxy. Click the settings tab and ensure that ‘Enable HAProxy’ is checked. The easiest way to proceed is to setup the backends first then the frontends. For this example we’re going to use a regular website served on port 80.
- Click on the Backend tab. Click Add. In the Server list you will add your server information like in the picture below and click save.
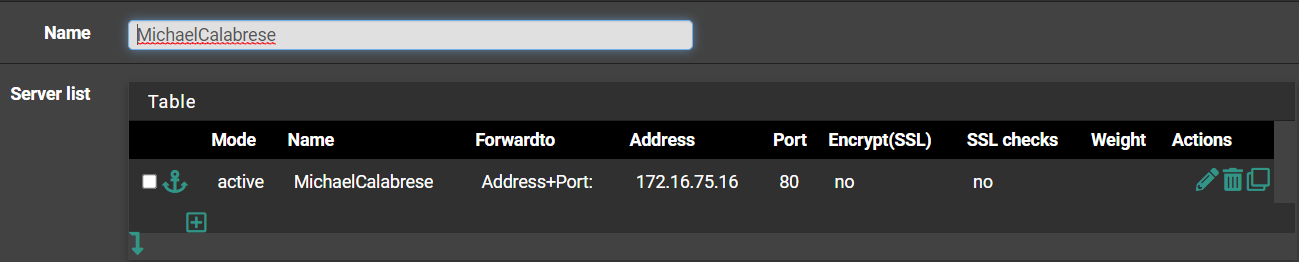
Here’s a BIG hint for backends that don’t use port 80 or 443. Change the health check method from HTTP to either Basic or None so you don’t have issues with HAProxy thinking your server is dead. - Click the Frontend tab. We’re going to create the main frontend for all incoming traffic from Cloudflare. Set the Name to something that makes sense, I used External_Cloudflare_Shared. For External Address you will use WAN Address (IPv4), port 443, SSL Offloading checked. Type should be http / https(offloading). I set my default backend to my website, this is what will get used if your incoming traffic doesn’t match any of your rules (maybe removed a service but didn’t remove it from Cloudflare’s DNS.)In the SSL Offloading section you will set the certificate to the one you created earlier from Cloudflare. If you’re hosting multiple domains through the same HAProxy instance you can also add additional certificates for each domain under Additional certificates. Under Advanced ssl options I entered the following:
no-sslv3 no-tlsv10 no-tlsv11 no tlsv2 no-tls-tickets ciphers ECDHE-ECDSA-AES128-GCM-SHA256:ECDHE-ECDSA-AES256-GCM-SHA384:ECDHE-ECDSA-AES128-SHA:ECDHE-ECDSA-AES256-SHA:ECDHE-ECDSA-AES128-SHA256:ECDHE-ECDSA-AES256-SHA384:ECDHE-RSA-AES128-GCM-SHA256:ECDHE-RSA-AES256-GCM-SHA384:ECDHE-RSA-AES128-SHA:ECDHE-RSA-AES256-SHA:ECDHE-RSA-AES128-SHA256:ECDHE-RSA-AES256-SHA384:DHE-RSA-AES128-GCM-SHA256:DHE-RSA-AES256-GCM-SHA384:DHE-RSA-AES128-SHA:DHE-RSA-AES256-SHA:DHE-RSA-AES128-SHA256:DHE-RSA-AES256-SHA256Under Advanced certificate specific ssl options I enteredalpn h2, http/1.1These settings are kind of aggressive but they will earn you an A+ on ssllabs.com. - Back on the Frontend tab, click Add. We’re going to make a frontend for our website specifically so that we can filter the names that will allow us to get there. I named it Websites since I host two with this frontend. Check the box for ‘Shared Frontend’. Under Access Control lists I used the following, adjust as necessary:
- Name:
mc, Expression:Host starts with:, CS:no, Not:no, Value:michaelcalabrese.me - Name:
mc, Expression:Host starts with:, CS:no, Not:no, Value:www.michaelcalabrese.me
Under Actions I used the following: - Action:
Use Backend, Backend:michaelcalabrese, Conditional acl names:mc
The backend will be selected from a dropdown of backends that you have created. That’s why we did that first.
- Name:
- The last step is to create an inbound firewall rule to allow Cloudflare traffic to come through port 443. Head over to Firewall -> Rules -> WAN. Create a rule to allow IPv4 TCP traffic on port 443 to WAN address. Optionally you can restrict that list to only allow from Cloudflare IPs if you are super security conscious. Note that they could change their ranges in the future and you might end up blocking access unintentionally.
Congrats! You made it to the end and you should have a pretty secure SSL connection to your self-hosted websites or apps. This is a great way to forward any services that you want accessible from outside your network. I use this method to get access to my Home Assistant instance and my Emby Server!
Useful resources: https://github.com/ssllabs/research/wiki/SSL-and-TLS-Deployment-Best-Practices